You might wonder why floor screed is essential for achieving that perfect level flooring finish you’re aiming for. It’s not just about aesthetics; screed plays a critical role in ensuring durability and longevity for your floors. By providing a smooth, even base, it minimises the risk of cracks and other imperfections that could lead to costly repairs down the line. But how exactly does screed accomplish this, and what are the nuances involved in choosing and applying the right type? Understanding these elements could make all the difference for your next flooring project.
Key Takeaways
– Floor screed provides a stable and even base for final flooring installation.
– It minimises the risk of cracks, ensuring long-term durability and performance.
– Properly applied screed enhances adhesion for tiles, vinyl, or wooden flooring.
– Screed acts as a thermal conductor, optimising underfloor heating efficiency.
– High-quality screed prevents dips and ridges, ensuring a smooth surface finish.
Importance of Floor Screed
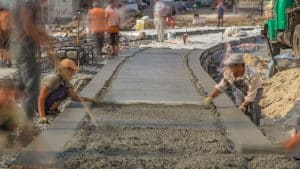
When it comes to achieving a level flooring finish, floor screed plays an essential role in guaranteeing durability and evenness. You need to understand the significance of selecting the right screed materials for your project. This choice directly affects the overall stability and longevity of the floor. High-quality screed materials provide a smooth surface and reduce the risk of cracks and unevenness.
During the installation process, precision is key. You should focus on mixing the screed materials properly, maintaining the correct consistency for peak performance.
Confirm the substrate is clean and primed to enhance adhesion. Use the right tools to spread and level the screed evenly.
Accurate execution of the installation process guarantees a robust and level finish, enhancing the floor’s durability and appearance.
Types of Floor Screed
Although there are various types of floor screed available, choosing the right one for your specific needs is vital to achieving the best results.
Traditional screed, a mixture of cement and sand, is ideal for areas where a solid, durable base is necessary. It requires skilled application and longer drying times, which can affect project timelines.
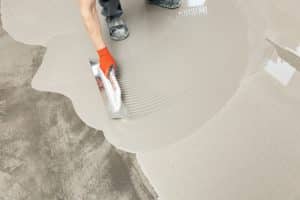
On the other hand, self-levelling screed is perfect for achieving a smooth, flat surface quickly and efficiently. This type of screed is flowable and spreads with ease, making it suitable for underfloor heating systems and rapid installations.
Both types play significant roles depending on your project’s demands, but understanding their distinct properties guarantees you select the best screed type for your flooring finish.
Screeding Techniques
Having chosen the appropriate type of floor screed for your project, mastering the proper screeding techniques guarantees a flawless finish.
Start by preparing your screeding materials, ensuring they’re mixed to the right consistency. Use a straightedge or screeding tools like a spirit level to spread and level the material evenly.
Work methodically, starting from one corner of the room and moving towards the exit. Maintain steady pressure to avoid dips or ridges in the screed. Regularly check the levelness with your spirit level, adjusting as necessary.
Pay attention to drying times; premature foot traffic can compromise the surface. Clean your screeding tools immediately after use to maintain their effectiveness for future projects.
Precision in technique leads to superior results.
Benefits of Using Screed
Incorporating floor screed in your construction or renovation project offers numerous advantages that enhance both functionality and aesthetics.
Screed materials, such as cement-based or anhydrite, provide a robust foundation that guarantees a smooth, level surface. This is particularly beneficial when laying tiles, vinyl, or wooden flooring, as it prevents uneven surfaces that could lead to damage or wear.
For ideal results, follow installation tips like confirming a clean, dry substrate and using the correct mix ratios. This assures the screed adheres properly, minimising the risk of cracks or deformations.
Additionally, screed acts as an excellent thermal conductor when paired with underfloor heating systems, improving energy efficiency.
Common Screeding Mistakes
Even skilled professionals can make common screeding mistakes that compromise the integrity and longevity of the floor.
One typical screeding error is improper mixing of the screed material. If the mix is too dry or too wet, it leads to levelling challenges and weakens the final surface.
Another frequent mistake involves inadequate preparation of the substrate. Failing to clean, prime, or repair the base can cause adhesion issues, resulting in uneven flooring.
Incorrect thickness application is another pitfall; an inconsistent layer can cause cracks or hollows, affecting the floor’s durability.
Ultimately, rushing the curing process can lead to shrinkage and cracks.
Maintenance and Care
To guarantee your floor screed remains in top condition, regular maintenance and proper care are essential.
Start with routine cleaning to prevent dust and debris build-up. Use a soft-bristle broom or a vacuum designed for hard surfaces to avoid scratching.
For deeper cleaning, a damp mop with a neutral pH cleaner is advisable. Avoid harsh chemicals that can damage the screed’s integrity.
Inspect the surface regularly for cracks or chips. If you find any, prompt repair techniques are vital.
Use a suitable screed repair compound to fill small cracks, ensuring a smooth finish. For larger repairs, consider professional help to maintain the screed’s structural integrity.
Frequently Asked Questions
What Materials Are Commonly Used in Making Floor Screed?
When making floor screed, you’ll commonly use cement mixtures with various aggregate types. Opt for sharp sand or fine gravel as aggregates. Adjust the proportions based on your project’s specifications to guarantee maximum strength and durability.
How Long Does Floor Screed Take to Dry Completely?
Imagine watching paint dry; floor screed’s drying time is similar. Typically, it takes 24-48 hours to set, but drying conditions like temperature and humidity can stretch this period to weeks for a fully cured, level finish.
Can Floor Screed Be Used for Outdoor Spaces?
You can use floor screed for outdoor applications, ensuring a durable, level surface. Choose a screed with high durability to withstand weather conditions and heavy use. Properly mixing and applying it guarantees longevity and resilience in outdoor environments.
Is Professional Installation Recommended for Floor Screed?
Think of floor screed as the foundation of a perfect painting. You’d benefit from professional installation to master the screed benefits; their precise installation techniques guarantee durability, smoothness, and the flawless finish your flooring deserves.
Are There Eco-Friendly Options Available for Floor Screed?
Yes, you can find eco-friendly options for floor screed. Sustainable materials like recycled aggregates and low-carbon cements offer green alternatives. Choose these to reduce environmental impact while maintaining durability and performance in your flooring projects.
Conclusion
In the grand tapestry of floor installation, screed is the unsung hero, ensuring a level and durable finish. By understanding the importance of selecting the right type and technique, you lay the groundwork for success. Avoid common pitfalls and pay attention to maintenance, as these steps are essential for longevity. With screed, you’re not just building a floor; you’re crafting a foundation that stands the test of time, marrying aesthetics with performance seamlessly.