What Is Floor Screed?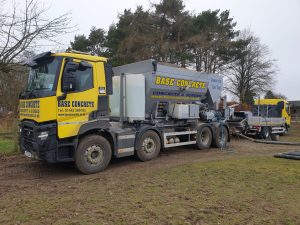
Floor screed is a thin layer of material, usually a mixture of cement, sand, and water, that is applied over a concrete base or subfloor. Its main purpose is to create a smooth, flat, and level surface that is ready for your final floor covering, whether that is tiles, wood, vinyl, carpet, or another finish.
Think of screed as the bridge between your rough concrete slab and the polished floor you see when you walk into a room. Without it, your floor coverings would sit on an uneven surface, leading to cracks, poor adhesion, and an uneven finish that looks and feels wrong underfoot.
At Base Concrete, we supply floor screed across North London, Hertfordshire, Buckinghamshire, and Bedfordshire. As a family-run business established in 2002, we offer a range of bespoke screed mixes to suit your project, whether it is a small domestic renovation or a large commercial build. We even have smaller trucks for sites where access is tight, and concrete pumps to place screed exactly where you need it.
Why Is Floor Screed Essential?
If you are planning any kind of flooring project, screed is not just a “nice to have”. It plays a critical role in making sure your finished floor looks great and lasts for years. Here is why screed matters:
A Perfectly Level Surface
The most important job of floor screed is to create a completely flat and even base. This is vital because most floor coverings need a level surface to sit on properly. Tiles laid on an uneven base will crack or lift. Vinyl will show every bump and dip. Wooden flooring may warp or develop gaps. A well-applied screed eliminates these problems by giving you a uniform surface to work with.
Improved Durability
Floor screed adds a layer of strength to your flooring system. It redistributes loads evenly across the floor, which prevents stress points that can lead to cracking over time. This is especially important in areas with heavy foot traffic, such as hallways, kitchens, and commercial spaces. High-quality screed materials can withstand significant wear and tear, keeping your floor in good condition for many years.
Moisture Resistance
A properly applied screed forms a barrier that helps prevent moisture from travelling upwards through the concrete base and into your floor covering. This protection is particularly important in rooms prone to dampness, such as bathrooms, kitchens, and ground-floor rooms. Moisture reaching your floor finish can cause warping, swelling, mould growth, and adhesion failure.
Protection Against Temperature Changes
Screed acts as a buffer against temperature fluctuations. It absorbs and gradually releases heat, which prevents the kind of sudden expansion and contraction that can damage floor coverings. This thermal mass quality makes screed especially valuable in buildings where temperatures vary significantly.
Better Adhesion for Floor Coverings
A smooth, well-prepared screed surface gives tiles, vinyl, wood, and other floor coverings the best possible grip. This uniform adhesion means your floor finish sits flat and secure, reducing the chance of tiles lifting, vinyl bubbling, or wood planks separating.
Sound Insulation
Floor screed also helps to reduce noise transmission between floors. Its dense composition absorbs and dampens sound waves, reducing both airborne noise and impact noise such as footsteps. This is particularly valuable in flats, multi-storey homes, and commercial buildings where noise transfer between floors can be a problem.
Types of Floor Screed
Choosing the right type of screed depends on your project requirements, including the floor covering you plan to use, the drying time you can allow, and whether you are incorporating underfloor heating. Here are the main types:
Traditional Sand and Cement Screed
This is the most commonly used type of screed, made from a simple mixture of cement and sharp sand, typically in a ratio of 1:3 or 1:4. It is versatile, affordable, and provides a robust base suitable for most floor coverings.
Traditional screed is applied in a semi-dry form and compacted down to create a solid surface. Hair-like fibres are often added to the mix for extra bonding during the curing process, and a retarder can be included to give you between four and six hours of working time.
For bonded applications, a minimum thickness of 40mm is recommended. For unbonded or floating screeds, you should aim for at least 65mm. This type of screed requires skilled application and has longer drying times than some alternatives, which is worth factoring into your project timeline.
Self-Levelling (Liquid) Screed
Self-levelling screed, also known as liquid or flowing screed, has a much wetter consistency than traditional screed. It flows across the floor and finds its own level, which means you get an exceptionally smooth and flat surface with minimal manual intervention.
This type of screed is particularly popular for underfloor heating installations because it flows around heating pipes, ensuring full contact and eliminating air pockets. This gives you excellent heat transfer and even distribution across the floor.
Because of its liquid consistency, self-levelling screed does need to be pumped into position and the floor must be made watertight beforehand by laying a membrane to stop the fluid from escaping. It typically offers faster drying times than traditional screed.
Fast-Drying Screed
If your project has a tight deadline, fast-drying screeds are designed to cure much more quickly than standard mixes. Some can be ready for foot traffic within 24 to 48 hours, though full curing still takes time. These screeds are ideal for commercial projects or any situation where reducing downtime is a priority.
Fast-drying screeds may cost more than standard options, but the time savings on labour and project scheduling can make them very cost-effective overall.
Bonded, Unbonded, and Floating Screeds
These terms describe how the screed is attached to the surface below it:
Bonded screed is applied directly onto the concrete base using a bonding agent. It adheres firmly to the substrate and can be laid at thinner depths, making it ideal where floor height is a concern.
Unbonded screed is separated from the base by a membrane, usually a polythene sheet. This is useful where moisture is a concern, as the membrane acts as a damp-proof barrier. Unbonded screeds typically need to be at least 50mm thick.
Floating screed sits on top of a layer of insulation. This is the most common choice for underfloor heating installations and also provides thermal and acoustic benefits. Floating screeds generally need to be at least 65mm thick to ensure structural stability.
How Long Does Floor Screed Take to Dry?
One of the most common questions about floor screed is how long you need to wait before you can walk on it or lay your floor covering. Getting this right is essential, because rushing into tiling or laying flooring on damp screed can lead to serious problems including poor adhesion, cracking, and mould growth.
Initial Setting Time
Most floor screeds will set firm enough for light foot traffic within 24 to 48 hours. This means you can walk carefully on the surface after a day or two, but you should not place heavy loads on it or start laying floor coverings.
Full Curing and Drying Time
The general rule for traditional sand and cement screed is that it dries at a rate of roughly 1mm per day, under ideal conditions. This means:
- A 50mm thick screed will take approximately 50 days to dry fully
- For screed thicker than 50mm, the drying rate slows. Beyond 50mm, it takes roughly 2 days per millimetre. So a 75mm screed would need approximately 100 days
These are approximate figures based on ideal conditions, which means good ventilation, temperatures around 20°C, and relative humidity of about 65%. In reality, conditions are rarely perfect, and drying times can be significantly longer.
Factors That Affect Drying Time
Several things can speed up or slow down how quickly your screed dries:
Temperature: Warmer conditions help moisture evaporate faster. Cold weather slows the process considerably.
Humidity: High humidity in the air means the screed cannot release moisture as quickly. Aim for well-ventilated spaces with moderate humidity levels.
Screed thickness: Thicker screeds hold more moisture and take longer to dry. Always use only the thickness you genuinely need.
Screed type: Fast-drying screeds and some liquid screeds can dry significantly faster than traditional mixes.
Ventilation: Good airflow across the screed surface helps moisture escape. Opening windows or using fans can make a real difference.
Underfloor heating: If you have underfloor heating installed, it can be used to speed up drying, but this must be done gradually. Turning the heating on at full blast too soon can cause cracking.
How to Know When Screed Is Dry Enough
Before laying any floor covering, you should always test the moisture content of the screed. The industry standard is to test using a hygrometer, and the relative humidity within the screed should typically be below 75% before tiling or laying moisture-sensitive floor coverings.
Do not rely on the surface looking or feeling dry. Moisture can be trapped deep within the screed even when the top layer appears completely dry. According to the Concrete Society’s guidance on screed materials, proper moisture testing is always recommended before applying any floor finish.
Drying Tips for the Best Results
- Keep the room well ventilated with a stable temperature
- Avoid sealing or covering the screed surface while it is still drying
- If using underfloor heating to speed up drying, increase the temperature gradually over several days
- Do not force-dry the screed with direct heat sources, as this can cause cracking
- Plan your project timeline to allow adequate drying time from the start
Floor Screed and Underfloor Heating
Floor screed and underfloor heating systems work hand in hand. The screed plays a vital role in making sure your underfloor heating performs efficiently and keeps your space evenly warm.
How Screed Improves Heat Distribution
When underfloor heating pipes or cables are installed, the screed is poured over and around them. This encases the heating elements and creates a large thermal mass that absorbs heat from the pipes and distributes it evenly across the entire floor surface.
Without screed, or with poorly applied screed, you would get hot spots directly above the heating pipes and cold spots in between. Good screed application eliminates these inconsistencies, giving you a uniform temperature right across the room.
Thermal Conductivity
The type of screed you choose affects how well heat transfers from the pipes to the floor surface. Liquid (self-levelling) screeds are particularly effective for underfloor heating because they flow tightly around the pipes, leaving no air gaps. This gives superior thermal conductivity compared to traditional screeds, which may leave small voids around the pipework.
According to the Energy Saving Trust’s guide to underfloor heating, underfloor heating can be an efficient way to heat your home, and using the right screed is key to getting the best performance from your system.
Energy Efficiency
A well-chosen screed can reduce your energy bills by making your heating system work more effectively. The screed’s thermal mass means it stores heat and releases it slowly, even after the heating system switches off. This reduces the need for your boiler or heat pump to run constantly, saving energy and money.
A thinner screed layer generally responds more quickly to temperature changes, giving you faster heat-up times. A thicker layer holds heat for longer but takes more time to warm up. The ideal thickness depends on your specific heating system and how you use the space.
Choosing Screed for Underfloor Heating
For underfloor heating systems, you have two main options:
Liquid (self-levelling) screed is the preferred choice for most installations. It flows around the pipes for maximum contact, provides excellent thermal conductivity, and creates a perfectly smooth surface. It does require a pump to install and the subfloor must be sealed with a membrane.
Traditional sand and cement screed can also be used with underfloor heating. It needs to be carefully compacted around the pipes to minimise air pockets. It is more affordable but does not offer quite the same level of thermal performance as liquid screed.
Whichever type you choose, allow the screed to cure fully before gradually bringing the underfloor heating up to temperature. Turning the heat on too quickly can cause the screed to crack.
Floor Screed for Commercial and Industrial Projects
Floor screed is not just for homes. It is a crucial component in commercial and industrial buildings where floors need to handle heavy loads, constant foot traffic, and demanding environments.
High-Traffic Areas
Retail stores, offices, showrooms, and public buildings all benefit from a properly screeded floor. Screed provides the structural stability needed to handle hundreds or thousands of footsteps every day without showing wear. A high-quality screed base means your floor covering lasts longer and looks better for longer, reducing maintenance costs over time.
Industrial Flooring
In warehouses, factories, and workshops, floors need to stand up to heavy machinery, forklifts, spills, and regular cleaning. Screed provides a tough, durable base that distributes heavy loads evenly and resists damage. For industrial applications, thicker screeds with higher compressive strength are typically recommended.
Healthcare and Education
Hospitals, clinics, schools, and nurseries require floors that are easy to clean and sanitise. Screed provides a smooth, seamless base that supports hygienic floor coverings and stands up to frequent cleaning without deteriorating.
Cost-Effectiveness for Commercial Projects
While screed adds to the upfront cost of a project, it delivers significant long-term savings. By providing a level, stable base, it reduces the risk of floor failures that require expensive repairs. It extends the lifespan of your floor covering and reduces ongoing maintenance costs. For large commercial spaces, the time savings from fast-drying screeds and pump-assisted delivery can also reduce labour costs.
Floor Screed for Home Renovations
Whether you are renovating a single room or transforming an entire house, floor screed can make a significant difference to the quality of your finished floors.
Creating a Fresh Start
In older properties, existing floors are often uneven, cracked, or damaged. Rather than trying to work around these imperfections, a new layer of screed gives you a clean, level surface to work with. You can apply screed over existing concrete, timber subfloors, or even over old tiles in many cases, saving the time and cost of removing old materials.
Versatility
Floor screed works with virtually any floor covering you might choose for your renovation. Tiles, engineered wood, laminate, vinyl, carpet, and even polished or decorative finishes can all be laid over a properly prepared screed surface. This makes screed the ideal foundation for any design scheme.
Adding Underfloor Heating
If you are renovating and want to add underfloor heating, screed is the perfect partner. A floating screed laid over insulation and heating pipes gives you an efficient, warm floor without raising the floor level by too much.
Environmental Benefits
Modern screeds can be formulated with recycled aggregates and low-VOC (volatile organic compound) binders, making them a more environmentally friendly choice. Screed also reduces waste because it can be mixed to the exact quantity you need, especially when using a volumetric mixer like the ones we use at Base Concrete. You only pay for what you use, and there is very little waste.
How Floor Screed Is Installed
Understanding the installation process helps you plan your project and ensures you get the best possible result from your screed.
Step 1: Subfloor Preparation
Before any screed is laid, the subfloor must be thoroughly prepared. This means:
- Checking for and repairing any cracks, holes, or structural weaknesses
- Cleaning the surface to remove all dust, debris, and contaminants
- Testing the moisture content of the subfloor using a moisture metre (industry standards suggest moisture should be below 75% relative humidity before screed is applied)
- Installing a damp-proof membrane if required
- Laying insulation and/or underfloor heating pipes if these are part of your project
Poor subfloor preparation is one of the most common causes of screed failure. Taking the time to get this step right is essential. The Concrete Centre’s technical guide to floor screeds provides further detail on specifying screed depth and type for different applications.
Step 2: Mixing
For traditional screed, the mixture should have the consistency of damp sand. It should hold together when squeezed but crumble if pressed too hard. The typical mix ratio is 1 part cement to 3 or 4 parts sharp sand. Water is added gradually to avoid making the mix too wet, which weakens the finished screed.
At Base Concrete, we use volumetric mixers that mix your screed fresh on site. This means you get exactly the right consistency every time, and you only pay for what you use.
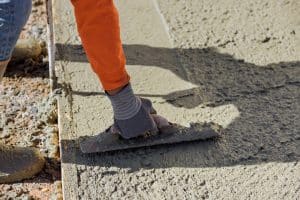
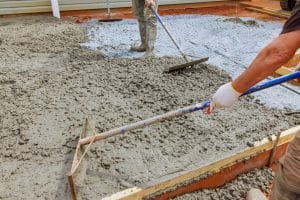
Step 3: Laying and Levelling
The screed is poured or placed starting from the far corner of the room and worked back towards the exit. A straightedge or screed board is used to level the surface, and a float or trowel smooths out the finish.
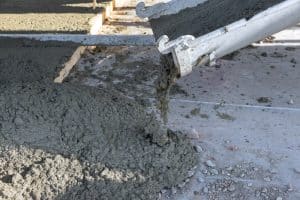
For self-levelling screeds, the process is different. The liquid screed is pumped into the prepared space and finds its own level, creating a very smooth surface with minimal manual work.
Step 4: Curing
Once the screed is laid and levelled, it needs time to cure and dry. During the first few days, the screed should be protected from rapid drying by keeping it covered or maintaining a stable environment. Rapid drying can cause the surface to crack.
For the best results, allow natural ventilation after the initial curing period and monitor the moisture levels before laying any floor covering.
Common Mistakes to Avoid
Even experienced builders can make mistakes with floor screed. Here are the most common pitfalls and how to avoid them:
Not preparing the subfloor properly: Dust, debris, or excessive moisture on the subfloor will prevent the screed from bonding correctly. Always clean and test the subfloor before starting.
Getting the mix wrong: Too much water weakens the screed. Too little makes it difficult to work with and can leave voids. Follow the manufacturer’s recommended ratios and add water gradually.
Laying screed too thick or too thin: Incorrect thickness can cause problems from delayed drying to insufficient strength. Follow the recommended thickness guidelines for your specific type of screed and application.
Tiling or laying flooring too soon: This is one of the most common and costly mistakes. Always test the moisture content of the screed before applying any floor covering. Rushing this step can lead to adhesion failure, cracking, and mould.
Poor curing conditions: Exposing fresh screed to direct heat, draughts, or freezing temperatures can cause cracking. Maintain a stable, moderate environment during the curing period.
Overworking the surface: Excessive trowelling can bring too much water and fine material to the surface, creating a weak layer called laitance that can cause problems with adhesion later.
Maintenance and Care for Screeded Floors
Once your floor covering is laid, your screed is largely hidden and protected. However, in situations where screed is left exposed (such as in some industrial or contemporary design settings), or if you need to maintain the screed before a covering is applied, a few simple steps will keep it in good condition:
- Clean regularly with a soft broom or vacuum to prevent dust and grit build-up
- For deeper cleaning, use a damp mop with a neutral pH cleaner. Avoid harsh chemicals that can damage the surface
- Inspect periodically for any signs of cracking or wear and address repairs promptly
- In high-traffic areas, consider applying a suitable sealant for extra protection
Frequently Asked Questions
What is floor screed made from?
Floor screed is typically made from a mixture of cement, sharp sand, and water. Some screeds also include additives such as fibres for reinforcement, retarders to extend working time, or polymers to improve flexibility and bonding. Self-levelling screeds often use calcium sulphate or anhydrite instead of, or alongside, traditional cement.
How thick should floor screed be?
The ideal thickness depends on the type of screed and the application. As a general guide, bonded screed should be at least 40mm thick, unbonded screed at least 50mm, and floating screed (over insulation or underfloor heating) at least 65mm. For heavy-duty commercial or industrial applications, 50mm or more may be needed.
Can I use floor screed with underfloor heating?
Yes, floor screed is one of the best materials for use with underfloor heating. It encases the heating pipes, provides even heat distribution, and adds thermal mass that keeps your room warm even after the heating switches off. Self-levelling screed is especially effective because it flows tightly around the pipes.
How long before I can tile on a new screed?
As a rough guide, traditional screed dries at about 1mm per day under ideal conditions. A 50mm screed would therefore need around 50 days before tiling. Always test the moisture content with a hygrometer before laying tiles. The relative humidity within the screed should typically be below 75%.
Is floor screed suitable for all rooms?
Yes, floor screed can be used in virtually any room, including bathrooms, kitchens, living areas, bedrooms, hallways, and conservatories. It is also widely used in commercial and industrial settings. Different screed types and additives can be selected to suit the specific demands of each environment.
Can screed be used on upper floors?
Absolutely. Screed is commonly used on upper floors, especially in flats and multi-storey buildings. It provides a level surface for floor coverings and also helps with sound insulation between floors.
Does floor screed help with soundproofing?
Yes. The dense composition of floor screed makes it effective at reducing both airborne and impact noise. A thicker screed layer provides better sound insulation. For even greater acoustic performance, screed can be combined with resilient layers or acoustic insulation materials.
What is the difference between screed and concrete?
Concrete is a structural material used for foundations, floors, and walls. It contains larger aggregates and is designed for strength and load-bearing. Screed is a finer material applied as a thinner layer on top of concrete to create a smooth, level surface for floor coverings.
Why Choose Base Concrete for Floor Screed?
At Base Concrete, we have been supplying floor screed across North London and Hertfordshire since 2002. As a family-run business, we pride ourselves on friendly, helpful service and always aim to leave your site clean and tidy.
We offer a range of bespoke floor screed mixes tailored to your project’s needs, whether you need traditional sand and cement screed, fast-drying screed, or a self-levelling mix for underfloor heating. Our volumetric mixers mean your screed is mixed fresh on site, so you get the perfect consistency and only pay for what you use.
For sites with difficult access, we have smaller lorries that can get into tight spaces, as well as line pumps and boom pumps to place screed exactly where it is needed, even through houses, up alleyways, or over walls.
If you would like more information about our floor screed services, or to get a quote for your project, please get in touch or call us on one of our local numbers:
- Hemel Hempstead: 01442 389105
- St Albans: 01727 881979
- Watford: 01923 571221
- Luton: 01582 825545
- Aylesbury: 01296 906112